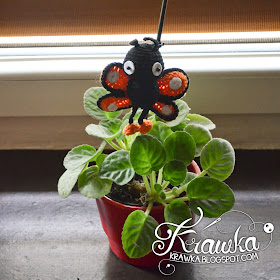
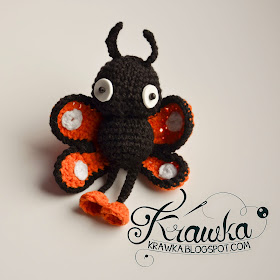
I don't know how long I have waited to write this post. There was always something else to do and the butterfly, which is pinned to the flower in my bedroom, was looking at me with silent accusation. So ok butterfly! I am writing! Are You happy?!
The monarch butterfly is the last in my series of potted plant decoration. I made my butterfly monarch so he is orange but I would love to see it in a different color. Butterfly's are easy this way that You can make them any color You like that will fit Your room or Your plant or anything else and it's still ok.
Materials:
- black, orange, white yarn ( I use the yarn which gauge is 24.0 to 30.0 sts = 4 inches )
- hook 3 mm
- white sheet of foam (mine is 1 mm thick) for eyes
- 2 black beads ( 4 mm would be best)
- clothes pin - the best would be the smaller version - 3 cm
- hot glue gun
- cotton or something else You will use as filament
Pattern:
Head
black yarn
R1: 6 sc in MR (6)
R2: inc around (12)
R3: * sc, inc * X6 (18)
R4: * sc 2, inc *X6 (24)
R5: sc around (24)

R6: sc around (24)
R7: * sc 3, inc *X6 (30)
R8: sc around (30)
R9: * sc 4, inc* X6 (36)
R10: * sc 3, dec* around (31)
R11: * sc, dec * around (21)
R12: * sc, dec * around (14)
stuff the head
R13: dec around (7)

R14: dec round (4) FO
From the white foam cut two circles for the eyes. If You don't like the edges of Your foam, You can use a nail file to make them better.
Sew them to the head with the bead in the center.
Antennas - make 2
black yarn
R1: 8 ch (8)
R2: starting from 2-nd ch ss 7 (7) FO
Sew antennas to the head.
black yarn
R1: 8 ch (8)
R2: starting from 2-nd ch ss 7 (7) FO
Sew antennas to the head.
 Body
Bodyblack yarn
R1: 6 sc in MR (6)
R2: inc around (12)
R3: * sc, inc *X6 (18)
R4: * sc 2, inc * X6 (24)
R5 - R8: sc around (24)
R9: * sc 2, dec *X6 (18)
stuff!
R10: * sc, dec *X6 (12) FO
Where You have ended is the part You will sew to the head.

Leg - make 2
black yarn
R1: 10 ch
R2: starting from 2-nd ss 9 (9) FO
Foot - make 2
orange yarn
R1: 6 sc in MR (6)
R2: * sc, inc*X3 (9)
Wings are made from 4 orange parts and 8 white dots. Upper wings are a bit larger than lower.
Upper wings - make 2
orange yarn
R1: 12 ch (12)
R2: 11 sc on one side of chain, 11 sc on other (22)
R3: ss 3, sc 3, hdc 2, dc 2, 3 dc in 1, 3 dc in 1, dc 2, hdc 2, sc 3, ss 2 FO
Lower wings - make 2
orange yarn
R1: 12 ch (12)
R2: 11 sc on one side of chain, 8 sc on other side, hdc, dc, 3 dc in 1,
R3: 3 dc in 1, dc, hdc, sc, ss FO
White dots - make 8
white yarn
R1: 5 sc in MR, ss in 1-st sc FO

Sew the dot to each size of every wing. That is why You needed 8. 4 orange parts of wings front and back equals 8.
Now sew lower and upper parts of wing together.
Last step is making an outline. Take black yarn and make sc around the lower and upper part.
Finished wing.
Sew all the butterfly parts together, if You would like to You can attach the mini clothes pin. I glued it with hot glue gun the way You see on the picture below.


No comments:
Post a Comment